Bezier Context is a PASeq action step that can store multiple sets of bezier paths as keyframes, and generate bezier movement when interpolating between 2 different keyframes. Today we’ll discuss how to use a Morph Context to generate image morph effect.
Studio Artist uses the positioning and movement of bezier paths over time to specify a morph between 2 different images. A Morph Context is a PASeq action step that can store a set of bezier paths and a reference to an image in a keyframe. An image morph is generated when a Morph Context interpolates between 2 different keyframes.
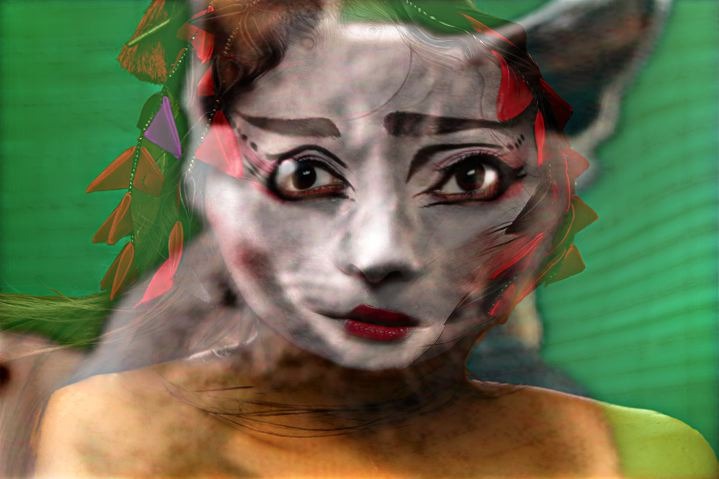
The below will show how to use a Morph Context to morph between 2 different images, a woman’s face and a cat face. The effected image at the top of this post shows an intermediate frame position between 2 Morph Context keyframes. The first keyframe stores a reference to the woman’s face image, and the second keyframe stores a reference to a cat face image.
Both keyframes store a file pathname reference to the actual images, as well as a set of bezier paths that were hand drawn to anchor different facial features. The idea is to draw bezier paths around facial features, like the eyes, mouth, and face. These bezier paths are stored in the Morph Context keyframes along with the associated image file pathnames.
The end result of a morph effect could either be a static intermediate morphed image like the one at the top of this post, or a morph animation that transforms over time from one image to another. For this particular post example, we’ll just morph between 2 different images. However, you could follow the approach we’ll be discussing that allows you to build a morph effect using a Morph Context action step and use as many different images and associated keyframes as you wish.
The PASeq below shows what we want to generate. We want to end up building a one step PASeq that has a single Morph Context action step with 2 different keyframes. For the purpose of this demonstration I spaced the 2 keyframes 20 frames apart.
To get started, I first erased the PASeq list (Erase button at the top of the PASeq palette), and I erased the current bezier path frame (Path : Path Layer Commands : Erase menu).
There are 2 different approaches you could take to build this PASeq. You could add a Morph Context with a single keyframe by using the Action : PASeq Timeline : Context Morph menu command. This would generate a Morph Context action step with a single keyframe at frame time 1 that references the file pathname for the current source image, and stores whatever is in the bezier path frame as the set of bezier paths stored in that one keyframe. You would then add additional keyframes manually one by one.
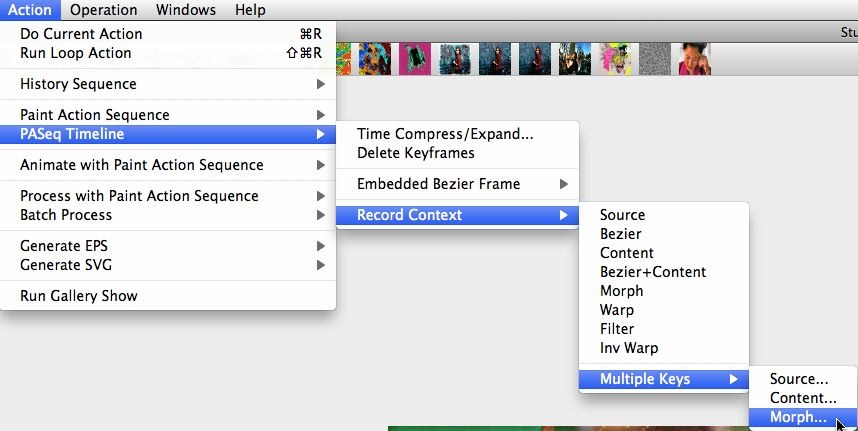
The second approach is to use the Action : PASeq Timeline : Context : Multiple keys : Morph menu command (this is the command we used as shown in the 2nd gallery image above). This menu command lets you select multiple source images with a standard file dialog. Every time you press the OK button, the image you selected will be used as a new keyframe for the generated Morph Context action step. So you can easily build up a morph sequence composed of multiple images from this single menu command. I selected 2 different images, first the woman’s face image and then the cat face image. Then I pressed the Cancel button to get out of the standard file dialog loop.
At this point I had a single Morph Context action step in my PASeq with 2 adjacent red keyframes recorded at frame times 1 and 2. The Multiple Keys menu command we used above places the multiple source image references you select as adjacent keyframes. Obviously we will need to space them apart (like in the 1st gallery image above) when we are ready to generate a morph effect. We’ll use the Action : PASeq Timeline : Time Compress/Expand menu command when we’re ready to do that.
Because I erased the bezier path frame prior to generating the Morph Context action step, no bezier paths were recorded in any of it’s keyframes. An alternate approach would have been to have first worked with the first morph image as the source image and to have build a set of bezier path referencing that image, and then to generate the Morph Context action step afterwards. That way each of the keyframes in the Morph Context would have the same set of bezier paths in them, which could then be edited so that they matched the desired image features for each of the images referenced in the different keyframes.
I now needed to generate bezier path feature anchors for each of the keyframes in my Morph Context action step. To do this I first switched to Bezier Draw operation mode (as shown below).
Clicking on one of the Morph Context action steps will load the canvas with it’s reference image, and load the bezier path frame with it’s stored bezier paths. So I clicked on the first keyframe to load the woman’s face. Since the bezier path frame was empty when we generated the Morph Context, the bezier path frame will be empty when we click on the keyframe.
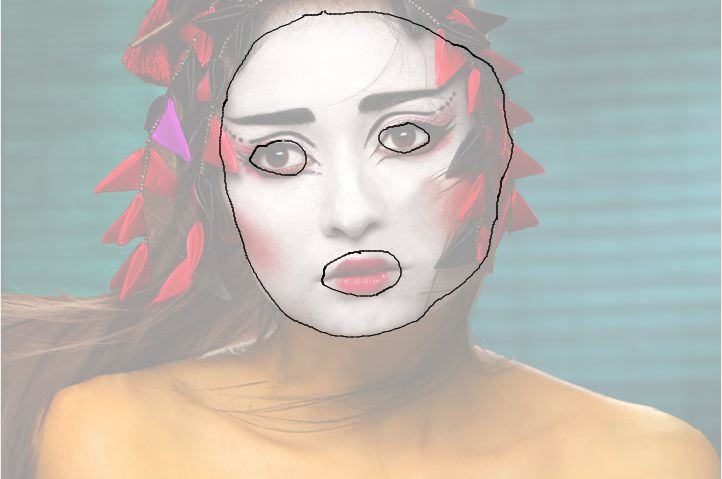
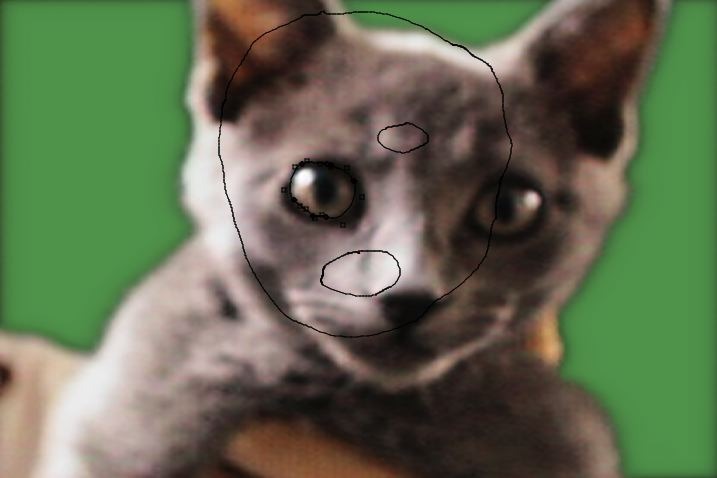
Since we’re in Bezier Draw operation mode we can now draw in the bezier paths we want to use as our feature anchors. I drew a bezier path around the left eye, right eye, mouth, and face (2nd image above). I made the canvas partially transparent in the 3rd gallery image above just so you could get a better idea about where I positioned my 4 hand drawn bezier paths.
I now needed to record the bezier path anchor points in my first Morph Context keyframe. To do this I option clicked the red keyframe at frame time 1.
Now I was ready to record my second set of bezier path anchors for my second keyframe. There are several different ways I could approach this. I could click the second keyframe to load in the second reference image and then draw 4 new bezier paths. if you do this you need to make sure you draw them in the same feature order (since the bezier paths in adjacent keyframes will interpolate based on their index position in the recorded bezier path frame stored in the keyframes). You don’t want an eye path interpolating to a mouth position in a different keyframe (unless you are trying to do some crazy effect rather than a standard feature morph).
I tried a slightly different approach. I first switched to Bezier Edit operation mode as shown below.
I then selected all of the bezier paths in the bezier path frame associated with my first morph image. I then used the Edit : Copy menu command to copy them to the clipboard. I then clicked on the second Morph Context keyframe at frame time 2 (that contains the cat image reference). The cat image appeared in the canvas. I then used the Edit : Paste menu command to past my original bezier paths I drew to anchor the woman’s face into the bezier path frame (2nd gallery image above). Note that the old bezier paths don’t match the facial features of my second morph image (the cat image). So I need to edit them to do that.
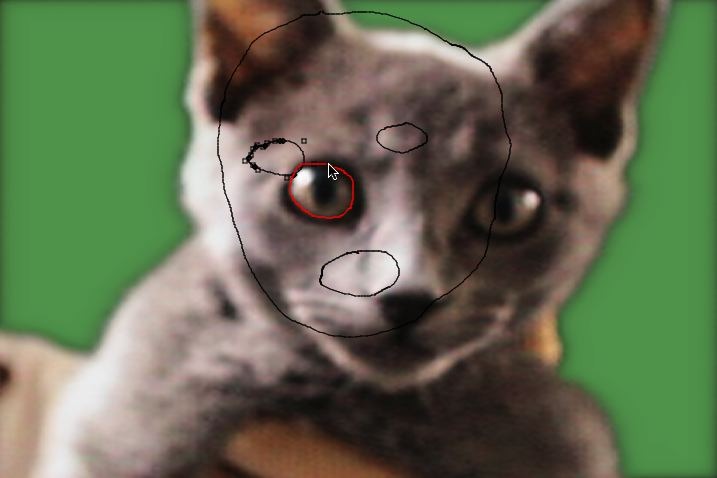
I could select individual curves, then drag them around, and then move the control paints to reshape the bezier path. However, I used a cool feature that lets you select an individual path and then redraw it as a fast alternative way to edit an individual path. I first selected an individual path (the left eye as shown in the 3rd gallery image above). I then held down the e key, and then drew a red path where I wanted the selected path to be positioned and reshaped (4th gallery image above). When I lift the pen (or release the mouse button after drawing the edited new path), the old selected path is deleted and substituted for my newly drawn path (5th gallery image above).
I did this for all of the individual paths to generate the new set of bezier feature anchor paths (6th gallery image above). At this point I option clicked the second Morph Context red keyframe at frame time 2 to record my edited bezier paths into that keyframe.
At this point I have 2 morph keyframe that contain references to 2 different images, and also appropriate bezier paths to anchor the eyes, mouth, and face of the 2 reference images. I now need to expand the timeline so that the individual keyframes are spaced apart with blank empty keyframes between them that will interpolate as a morph between the 2 reference images. The morph is based on the movement of the individual bezier anchor paths over time.
To time expand the PASeq timeline, I ran the Action : PASeq Timeline : Time Compress/Expand menu dialog command. I entered 20 into the dialog for the adjustment ratio. This then time expands the 2 keyframes that used to be adjacent to each other so that they are now 20 frames apart.
The complete 20 frame morph animation can be seen here.
For more information on PASeq Contexts check out this tip.
For more information on Creating a Morph Animation check out this tip. This tip shows off a slightly different approach to generating the same effect we did in this post by manually adding individual keyframes one at a time to the Morph Context action step.

