The last 2 day’s posts have covered working with photo mosaic effects that tile in a regular grid pattern and allow for addition of non-overlapping sub blocks within the tiling mosaic to add additional detail. At the end of yesterday’s post we briefly mentioned that you could use the Vectorizer to define the region structure for a photo mosaic, which allows for all kinds of interesting non-regular mosaic patternings. Today’s post will discuss how to build irregular shaped photo mosaic effects based on Vectorizer generated regions.
We will still use the paint synthesizer and a movie source brush to ultimately paint in the photo mosaic effect. The Vectorizer will be used to generate the region shapes that will then be filled in one by one with a movie brush paint synthesizer preset. We’ll use the selection buffer as the means to use the Vectorizer output to drive the path start regionization in the paint synthesizer to build the irregular photo mosaic image.
The paint action sequence (PASeq) below is what was used to generate the photo mosaic effect shown above.
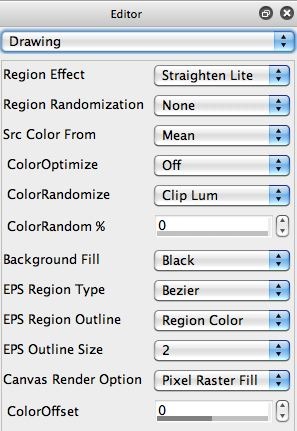
The first action step uses the Vectorizer to generate a flat color region abstraction of the source image. You can use all kinds of different Vectorizer effect settings for the purpose of specifying an irregular photo mosaic layout. The key point is that you want hard edges for the flat color regions (no anti-aliased vector drawing or additional gradient fill effects). To do this you need to make sure you use the Pixel Raster Fill option for the Canvas Render Option parameter in the Drawing control panel of the Vectorizer (2nd gallery image above).
The second action step in the PASeq used to generate the effect sets the current selection buffer to the contents of the canvas. To do this I used the Canvas : Selection : Set to : Canvas menu command. Note that Icould have eliminated this action step if I had set the Vectorizer Composite control to the Replace Region Selection setting. This second approach would have directly routed the Vectorizer output to the selection buffer without affecting the canvas image.
The 3rd gallery image above shows the output of the Vectorizer action step. Note that hard edges associated with the flat color regions (since we’re using a raster fill as opposed to a vector fill). The color canvas image gets converted into a black and white selection image. Every grayscale region in the selection buffer is going to be used as a template to be filled with a movie brush paint nib based on the shape of the grayscale region.
Note that if 2 adjacent vectorizer flat color regions generated identical grayscale output colorings, then the 2 regions would merge into one during the paint synthesizer path start regionization painting, but this is extremely unlikely to occur.
The 3rd action step is based on a movie source brush. the control panel gallery below gives you some idea how the paint preset was programmed. The first control panel shows that we’re using auto region fill as brush pen mode.
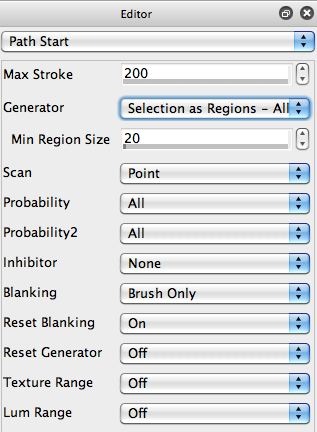
The 2nd gallery image above is the Path Start control panel. The Generator is set to the Selection as Regions – All Levels setting. What this means is that every unique flat color region in the selection buffer will be analyzed and used as a region to be filled by the path start regionization process.
One thing to be aware of is that the path start regionization processing will destroy the contents of the selection buffer. So if you want to re run the auto paint step, you need to regenerate the selection buffer you originally used before you can run the effect a second time.
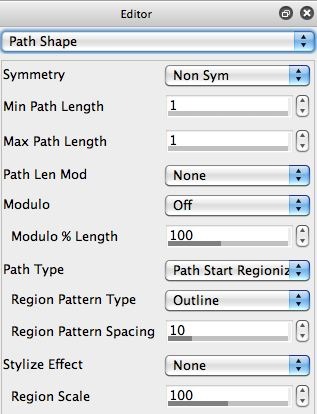
The 3rd gallery image above shows the Path Shape control panel. Note that we set the Path Type parameter to the Path Start Regionize setting. I then set the Region Pattern Type to Outline. This means that a path that represents the outline of the individual path start regions (which are determined by the contents of the selection buffer). Since we’re using auto region fill as brush pen mode for drawing, this outline path shape is determining a region to be filled with a single paint nib.
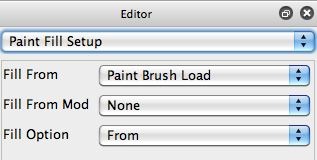
The 4th gallery image shows the Paint Fill Setup control panel, which determines how the paint nib to fill the region is generated. Note that it is based on the output of the paint Brush Load control panel. The 5th gallery image shows the settings used for the Image Processing paint brush load Type we are using. These last 2 control panels should look familiar, they are identical to what we used in our photo mosaic tiling posts over the last 2 days. So it’s taking the source movie brush frame image and re-colorizing it with a Paint Color Mean Shift Algorithm to better represent the current source color.
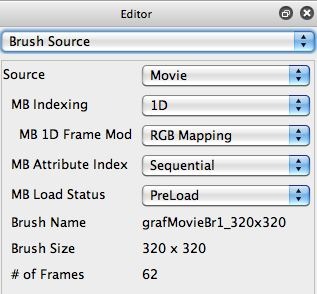
The 6th gallery image shows the Brush Source control panel. I’m using a graffiti movie brush with RGB Mapping chosen for the MB (movie brush) 1D Frame Mod (modulation) parameter. This movie frame index modulation option chooses the movie brush frame that best represents the current color we are trying to draw.
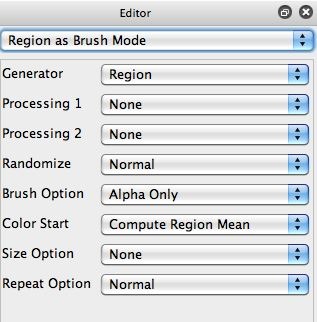
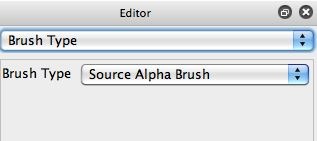
Region Fill as Brush pen modes typically overrides the Brush Source settings with a region generated by the current paint path. For this particular photo mosaic painting effect, we want to use the generated region to define the shape of the paint nib, but we want to use the actual movie source brush to do the fill (as opposed to the generated region). The 7th and 8th gallery images (Region as Brush Mode and Brush Type control panels respectively) show how we achieve this.
Note that the Brush Option parameter in the Region as Brush Mode control panel is set to Alpha Only. This means that only the Brush Source alpha channel is over-ridden by the Region as Brush Mode painting. The Brush Source RGB channels (which correspond to the movie brush RGB channels) are not affected.
We then used the Source Alpha Brush option for the Brush Type. This means that the brush shape will be based on the alpha channel of the source brush (which will be overridden by the Region as Brush Mode generated region every time we draw a region).
The programming trick we described above allows us to use the region fill as brush region shapes as the paint nib shape while still filling the region with the movie source brush.
I went for a fairly abstract look with the example shown at the top of the post. Tomorrow we’ll show how to add an additional Vectorizer action step to add some vector feature outlining to the irregular photo mosaic, which can help visually anchor the abstracted image.






1 Comment