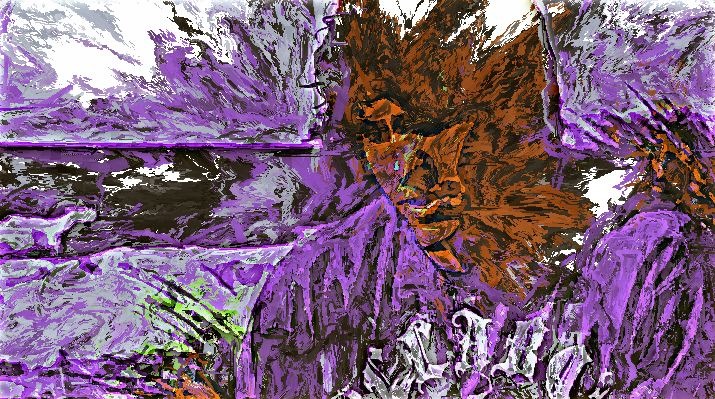
Today’ post continues the custom palette colorization thread we’ve been developing over the last 2 days worth of posts. We started out by showing how you could automatically generate a custom color palette from an image or painting you liked the color aesthetics of, and then use it to remap another image or movie to have similar color appearance. We then showed how to build a PASeq for movie processing that first colorized a source frame in the canvas, then temporarily reloaded the source area with the re-colorized image, and then used it as a temporary re-colorized source frame for auto-painting to build a paint animation movie effect.
The paint effect we used I yesterday’s post was very simple, and by erasing the canvas to white before painting when processing each frame we mentioned in passing that the resulting end animation result would probably have perceived visual flicker caused by the erase and then draw on a fresh canvas approach to building the paint animation. Today’s post will show off how to restructure the way we build our PASeq yesterday using 2 layers to allow for re-colorization of the source image in the canvas (in layer 1) while building up an over-drawing flicker free paint animation in a second layer.
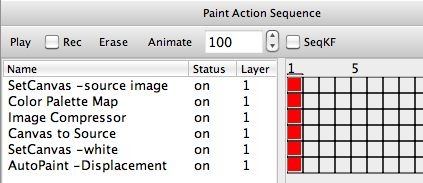
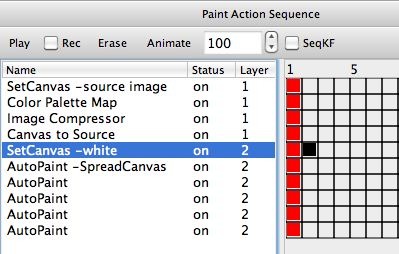
The trick we’re going to discuss in today’s post has been presented here before, but I thought it was worth a re-visit in the context of yesterday’s PASeq effect. The first gallery image below shows the paint action sequence (PASeq) we used to create yesterday’s effect. The second gallery image shows how we modified yesterday’s PASeq to allow for re-colorization in one canvas layer while building up an over-painting process in a second layer that allows for the generation of temporal coherence or continuity in the resulting output animation.
I slightly modified the kind of paint animation effect I used in today’s modified PASeq. I used the second example in a previous post that discusses the old Process Movie Tutorials examples we recently discussed in some posts here. The specific series of paint action steps I used today were directly lifted from the 05 Autoedge + Flow1 PASeq preset used in that old tutorial.
The first part of our reexamination of the old Process Movie Tutorials spent a long time explaining the concept of introducing temporal continuity into a paint animation as an approach to reduce perceived flicker in the resulting animation. The paint steps I lifted from the 05 Autoedge + Flow1 PASeq preset were designed to first modify the existing canvas by slightly spreading it out from the center to the edges of the canvas, and then overdrawing on top of the modified previous output frame.
Our re-colorization process starts by placing the original source frame in the canvas, then using the Color Palette Map ip op action step to re-colorize the original source with a custom color palette. The Image Compressor ip op is then used to slightly boost the contrast of the colorized canvas image. The colorized canvas image is then temporarily placed back in the source are to be used as a source for auto-painting with the Canvas to Source action step. How all of these steps were setup is described in detail in yesterday’s post.
The 3 action steps used for the colorization processing completely overwrite the canvas. So they preclude our ability to incorporate overdrawing onto the previous output frame when building a flicker free paint animation. But this is only true if we are using a single layer. The whole point of today’s post (the trick I referred to above) is that we use 2 different layers for building the processing effect. We use layer 1 to do the re-colorization processing. And we use layer 2 to build up the modify previous canvas and then overdraw on top of it paint animation processing to create a flicker free paint animation output.
If you look at the 2nd gallery image above, which shows our modified PASeq we are using today to build our colorized paint animation effect, you can see that the action steps associated with colorizing the source image and then returning the colorized canvas back to the source area are all using layer 1. And the action steps I grabbed from the 05 Autoedge + Flow1 PASeq preset we previously discussed here are taking place in layer 2.
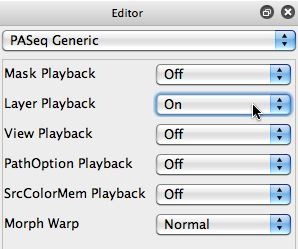
There are 2 very important things you need to setup in order for this 2 layer processing i’ve built up to work properly. They are detailed in the 3rd and 4th gallery images above. First, you need to make sure that the Layer Playback Editor control for paint action sequences is turned On. Doing so means that when the PASeq is played back the layers will automatically adjust to match the original layer used when the action step was recorded. You also need to make sure you manually setup Studio Artist to have 2 layers if you export the PASeq and then try to use it at a future date (since the PASeq assumes you have 2 active layers but doesn’t automatically add one if it’s missing).
The other important thing to setup is that the way this PASeq works depends on the canvas view being setup to View Current Layer (as opposed to View All Layers). The canvas view icon popup and how it should be configured is shown in the 4th gallery image above. We don’t want the 2 individual canvas layers to be composited together in the canvas view for this particular effect processing. We want them to be separate layers that are individual viewed depending on which one is the current layer.
By structuring the PASeq processing the way we did above, utilizing 2 different layers that are not composited together, we can use one layer to build a colorization effect without messing up our recursively building over-painting process taking place in a second layer.
You can also use this multiple layer approach is you want to add additional finishing action steps to your movie processing sequence, that would influence the overdrawing recursive paint buildup process in a negative way. You build up the overpainting in one layer, then use the Fixed Image ip op to transfer the layer image to a second layer, where you then run a series of optimization action steps to enhance the single frame output without modifying the overpainting process (which is building up over time in a different layer un affected by the optimization action steps).


