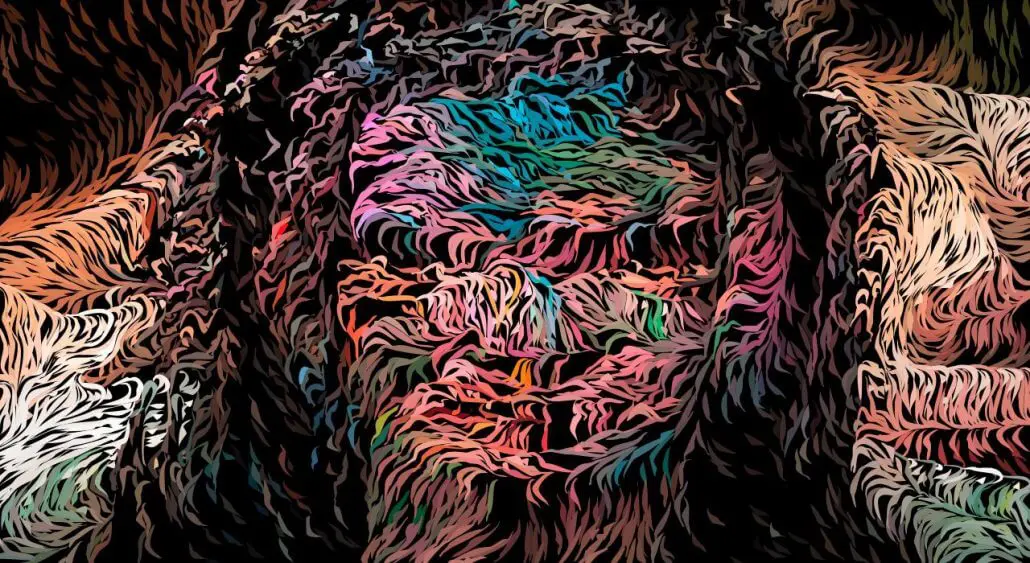
Yesterday we showed how to put together a vector paint preset that generated a black and white woodcut simulation effect. Today we’ll show another approach to building a woodcut simulation, this time in color. This particular woodcut effect is put together so that individual wood cut paint strokes don’t overlap any other paint strokes with additional spacing between them to better simulate a hand drawn woodcut styling.
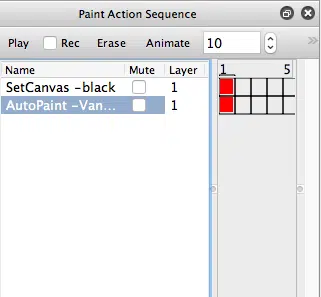
The color woodcut simulation shown above was created with the following paint action sequence (PASeq). This PASeq preset is available Color Woodcut.paseq
The effect starts by erasing the canvas to black.
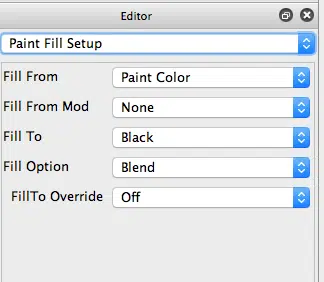
The Paint Fill Setup control panel is setup so that the Fill From parameter is set to the paint color. And the Fill To parameter is set to black. So the black center part of the Image Brush Source applies colored paint, while the exterior of the brush applies black paint.
Remember, any areas of the source brush that are solid white with pixel values 255 act as a mask for the brush. Source Brush pixels set to 254 are set to the Fill To setting. Source Brush pixels set to 0 are set to the Fill From setting. Pixels in between these 2 are set to a mix of the 2 Fill From – Fill To settings.
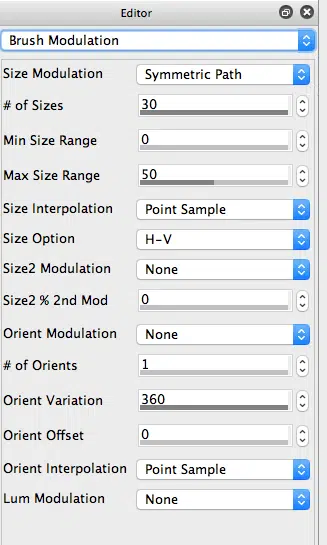
I wanted to have hard edges to my paint strokes, so I setup the Size Interpolation parameter in the Brush Modulation control panel to use the Paint Sample option. This interpolation option does not generate any intermediate gray values when the source brush is resized. I used the Symmetric Path option for the Size Modulation parameter to generate the automatic size tapering for the individual paint strokes (thick in the center, thin at the end points of each paint stroke).
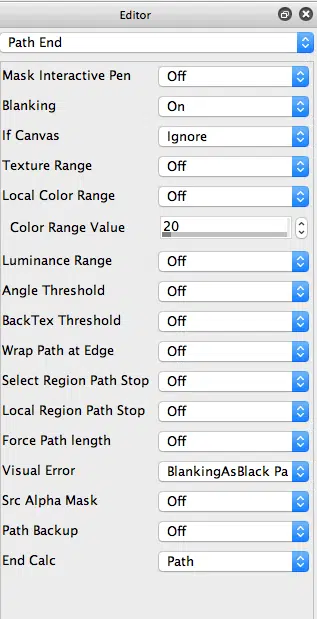
I’m using the Visual Error parameter in the Path End control panel (discussed in the last 2 day’s posts) to help intelligently build up paint strokes to best represent the source image while avoiding too much painting in any given area. Note that I set it to BlankingAsBlackCanvas LumErr since we are painting onto a solid black starting canvas.
We mentioned above that this particular paint preset is trying to be smart about not overdrawing paint strokes that have already been drawn (again to better simulate a hand drawn woodcut style). The image source brush was designed to do this. It only applies paint in the interior of the brush. But the complete brush area is painted into the hidden blanking buffer. The Blanking parameter in the Path Start control panel is set to Brush Only. So the complete brush nib gets painted in the blanking buffer as painting progresses.
The blanking buffer is a hidden 1 bit frame buffer that can keep track of paint coverage in the canvas. We are using it in this paint preset to insure that we don’t overdraw any existing painted strokes, while at the same time maintaining additional spacing between all of the painted strokes.
The Blanking parameter in the Path End control panel is also turned on. So any paint paths stop when they run into an existing painted path. Since the blanking buffer gets painted with the complete paint nib, while the color paint only gets applied in the interior of each paint nib, we always end up with some black space surrounded each color paint stroke.
I was interested in having the final effect be generated with smooth anti-alised vector paint strokes. But vector painting is not currently compatible wit fill the blanking buffer as described above, you currently need to use raster paint to have painting fill in the blanking buffer.
So, I used the raster paint process described above, and then used the Vectorizer’s Flat Input Technqiue to vectorizer the painted raster paint strokes after the fact. Remember, the Flat Input Technique is designed to take an existing flat color region raster image and directly convert it into a vector representation. This is why it’s so important to make sure the paint strokes have hard edges with no anti-aliasing in them.